In this post we will collect all the important things about different topics that we notice over time.
_**NOTE! If you notice something during the configuration or you had some problem and could solve it, it would be great for us and everyone else in the community if you share your knowledge with us. You can write me a short message and I will include it in this post.
IMPORTANT! If you have a problem with the setup or a feature and open an "Issue on Github ", please describe your problem as detailed as possible. Pictures can also help here.
IMPORTANT! When you open an "Issue ", follow the instructions bitterly see here How to create "Issues".
Contents:
- How do I create "Issues" when I have a problem
- Update Blueprint
- Update ESPHome
- Update TFT
- Manual TFT upload via local HA (coming soon)
- Upload TFT error and solution (coming soon)
- Notification via HA
- Climate control with relays
- Display internal switches as lamp in HA
- Quick navigation (coming soon)
- Call certain pages directly
- Play RTTTL Sound
- Advanced functions and automations (coming soon)
- Start automations via Input_Boolean
1. How to create "issues" when I have a problem
To be able to solve your problem, it is important for us to have as much information as possible.
- Issues can be created in DE or EN.
- Describe your problem as detailed as possible.
- Please write your ESPHome and Home Assistant version.
- Please go to your automation and then to the "3 dots" and then to Edit as YAML. Copy the complete code and attach it to the ticket
- An important "helper" for solving problems is the trace of an automation. You can find the trace under Settings --> Automations & Scenes --> your NSPanel automation --> Traces (top right)
TRACES! Please execute again what does not work and open the trace immediately afterwards. Often you have to open the trace after the reboot too. During the start up, most things are loaded.
IMPORTANT! in the trace you can see by the "orange " lines which way the automation has gone. Please tell us this path. Also, please take one or more screenshots and add them to your ticket. Especially important for us is where the "Orange " line ends, because most of the time this is also where the problem is.
IMPORTANT! When you have opened the trace, there is a "timestamp " at the top. It is important that you select the correct timestamp.
Example trace after reboot:

Example automations Blueprint:
alias: YYXYYXYYX - NSPanel Configuration
description: ""
use_blueprint:
  path: nspanel_configuration.yaml
  input:
    nspanel_name: nspanel_dev
    language: DE
    sync_value_ha: select_no
    sync_slider_ha: select_no
    weather: AccuWeather
    accuweather: home_wetter
    outdoortemp: sensor.terrasse_garage_motion_sensor_temperature
    humidity: sensor.kinderzimmer_lea_temperatur_sensor_humidity
    hotwatertemp: sensor.hotwater_temp
    hotwatercharge: switch.charge
    heatingsystemflame: binary_sensor.flamestatus
    climate: climate.nspanel_buro
    left_button_entity: light.haustur_spot_2
    right_button_entity: light.haustur_spot_1
    entity01: light.buro_sideboard
    entity01_name: Sideboard
    entity02: cover.kuche_rollo
    entity02_name: Küche Rollo
    entity03: switch.buro_dart_beleuchtung
    entity03_name: Dart Licht
    delay: 2
    right_button_name: Test 1
    left_button_name: Test 2
2. Update Blueprint
IMPORTANT: To install a new version of the NSPanel, the Blueprint, ESPHome and the TFT must be updated!
- In Home Assistant, go to Settings > Automation & Scenes, select the tab Blueprints and find the blueprint named "NSPanel Configuration"
- Click the 3-dot menu and select "Re-import blueprint":
- Click "Re-import" button:
- Reload automations or restart Home Assistant.
- The new Blueprint is now available. Settings that have already been made are adopted.
- Please review the blueprint settings (under Automations tab) for new settings available with the new version.
3. Update ESPHome
IMPORTANT:
- To install a new version of the NSPanel, the Blueprint, ESPHome and the TFT must be updated!
- These instructions are for updating a panel where an older version of these files are already installed.
To flash your panel with an updated version from this project, go to the ESPHome dashboard (in your Home Assistant) and find the device you want to update. Then click the 3-dot menu and select the option "Validate":
The system will go thru all the settings, combining your entries in "substitutions" and the ESPHome file(s) from the GitHub repository and validate the final setup. It might take some time.
If everything goes well, you will see a green check mark in the top of the dialog window. When you get that, you can click "Install":
As your panel is probably already connected to the Wi-Fi, you may select to install "Wirelessly", as it is much easier and you don't have to unassemble your panel.
The new firmware will be built and then flashed to your panel, which will restart at the end of this process and start sending logs again:
4. Update TFT
IMPORTANT: To install a new version of the NSPanel, the Blueprint, ESPHome and the TFT must be updated!
The display can be updated via the UI:
-
Go to Settings --> Devices & Services --> Integrations , select the display under the ESPHome integration.
-
Press the switch "Update TFT Display" under Configuration.
-
The display starts the update process and then restarts.
-HowTo---Alle-wichtigen-Dinge-die-man-wissen-sollte.assets/DisplayUpdate.PNG)
-HowTo---Alle-wichtigen-Dinge-die-man-wissen-sollte.assets/DisplayUpdate.PNG)
5. Manual TFT upload via local HA
coming soon
6. Upload TFT error and solution
coming soon
7. Notification via HA
To show a notification on the NSPAnel, the following service call can be used:
service: esphome.panelname_notification_show
data:
  label: Example text
  text: Example text
To clear any notifications, the following service call can be used:
service: esphome.panelname_notification_clear
data: {}
To use the notifications in an automation, again simply use the service call as shown in the example below:
description: ""
mode: single
trigger:
  - platform: state
    entity_id:
      - binary_sensor.motion_detector
    to: "on"
    condition: []
    action:
  - service: esphome.panelname_notification_show
    data:
      label: Motion Detected
      text: Example for a Notification on the Panel Screen
8. Climate control with Relays
Attention!! Although these instructions are still valid, since v4.0 there is a better way to setup a climate control using the panel's relays: https://github.com/Blackymas/NSPanel_HA_Blueprint/wiki/(EN)-Add%E2%80%90on:-Climate
In order to use the NSPanel to control a radiator or underfloor heating, at least one Generic Thermostat must be created in the HA. More information can be found here: https://www.home-assistant.io/integrations/generic_thermostat/
Example configuration Generic Thermostat:
climate:
  - platform: generic_thermostat
    name: Study
    heater: switch.study_heater ## Wenn das NSPanel Relays den Heizkreis Regler schaltet, kann dieses hier definiert werden
    target_sensor: sensor.study_temperature ## Hier kann der NSPanel Sensor verwendet werden
    min_temp: 15
    max_temp: 21
    ac_mode: false
    target_temp: 17
    cold_tolerance: 0.3
    hot_tolerance: 0
    min_cycle_duration:
      seconds: 5
    keep_alive:
      minutes: 3
    initial_hvac_mode: "off"
    away_temp: 16
    precision: 0.1
Afterwards, the climate.entity must be assigned accordingly in the panel configuration:-HowTo---Alle-wichtigen-Dinge-die-man-wissen-sollte.assets/climate.PNG)
9. Display internal switches as lamp in HA
In the world of Home Assistant, the relay in the NSPanel is a switch. And although this is generally correct, these relays are often used for a lamp or a fan, for example. If now e.g. a lamp is switched directly with the relay, it is desirable that also in the HA the switch is displayed as a lamp or that this "lamp" should be added to a light group.
With the Switch as X integration, these switches can be converted into the entity types that best suit the use case: https://www.home-assistant.io/integrations/switch_as_x/
-HowTo---Alle-wichtigen-Dinge-die-man-wissen-sollte.assets/Swichasx.png)
10. Quick Navigation
coming soon
11. Call certain pages directly
Sometimes it can make sense to automatically show a certain side of the display. To do this, the following service can be used:
service: esphome.nspanel_send_command_printf
data:
  cmd: page home
For example, to directly display button page 2, "home" must be replaced with "buttonpage02".
The following pages are currently available:
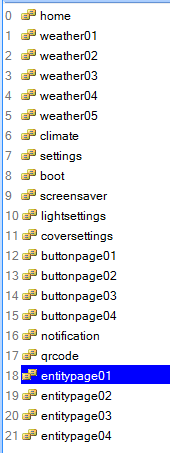
12. Play RTTTL Sound
HA can send a RTTTL to the NSPanel, custom melodies are possible.
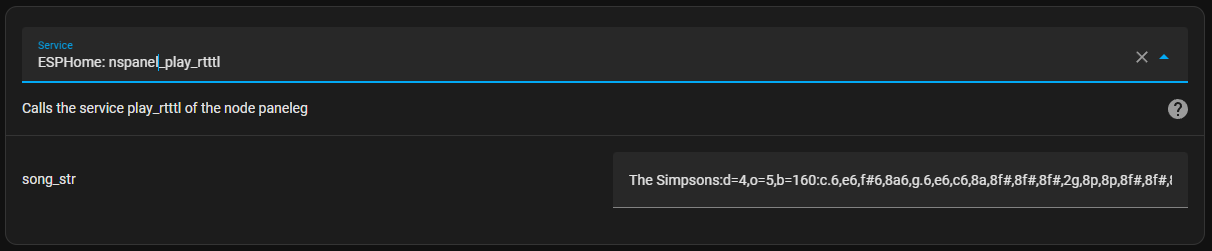
The use this function, the following service is called: nspanel_play_rtttl
You can find many RTTTL strings on the web, the important thing is that they must start with the name and then a colon.
Here is an example:
The Simpsons:d=4,o=5,b=160:c.6,e6,f#6,8a6,g.6,e6,c6,8a,8f#,8f#,8f#,2g,8p,8p,8f#,8f#,8f#,8g,a#.,8c6,8c6,8c6,c6
More information: https://esphome.io/components/rtttl.html#common-beeps
More songs: https://codebender.cc/sketch:109888#RTTTL%20Songs.ino
13. Advanced functions and automations
coming soon
14. Start Automations via Input_Boolean
Although the NSPanel can execute scripts directly over the buttons, there is also the possibility of starting automations directly by the means of Input_Boolean.
For this, a helper must first be created under Settings --> Devices&Services --> Helpers, see here:
https://www.home-assistant.io/integrations/input_boolean/-HowTo---All-important-thing-you-should-know.assets/Toggle1.PNG)
Now add the created Input_Boolean as a trigger in the desired automation under State:-HowTo---Alle-wichtigen-Dinge-die-man-wissen-sollte.assets/Toggle2.PNG)
In the last step, assign the trigger to a button in the Panel Config:-HowTo---Alle-wichtigen-Dinge-die-man-wissen-sollte.assets/Toggle3.PNG)