# Getting Started with NSPanel HA Blueprint
Welcome to this setup guide, a community-driven approach to integrating NSPanel into your smart home. Designed for users at all levels, it combines Home Assistant's user-friendly interface with ESPHome's customization options.
Whether you're a first-time smart device user or an enthusiast looking to personalize your setup, this guide provides the necessary tools and instructions. Let's embark on creating a smart home that's uniquely yours.
> [!NOTE]
> Some images or instructions on this guide might be slighly different due to different configurations depending on your ESPHome and Home Assistant implementation or versions.
> If you find something that is not understandable or needs to be updated, please let us know. You can create an issue reporting this, or fix it yourself and submit a [Pull Request](/Blackymas/NSPanel_HA_Blueprint/pulls) to this repository.
## Summary
- [Preparation](#preparation)
- [ESPHome Firmware](#esphome-firmware)
- [Preparing the ESPHome Environment](#preparing-the-esphome-environment)
- [Setting Up a Device on ESPHome Dashboard](#setting-up-a-device-on-esphome-dashboard)
- [Flashing the Device for the First Time](#flashing-the-device-for-the-first-time)
- [Integrating Your Panel to Home Assistant](#integrating-your-panel-to-home-assistant)
- [Making Changes Over The Air (OTA)](#making-changes-over-the-air-ota)
- [Updating](#updating)
- [Migrating from Other Custom Firmware](#migrating-from-other-custom-firmware)
- [Upload TFT](#upload-tft)
- [Selecting the Right File](#selecting-the-right-file)
- [Uploading to Nextion](#uploading-to-nextion)
- [Troubleshooting TFT Transfer Issues](#troubleshooting-tft-transfer-issues)
- [Blueprint](#blueprint)
- [Importing the Blueprint](#importing-the-blueprint)
- [Creating an Automation](#creating-an-automation)
- [Editing the Settings in Your Automation](#editing-the-settings-in-your-automation)
- [How to Handle Multiple Panels](#how-to-handle-multiple-panels)
- [Advanced Configuration for ESPHome and Home Assistant Experts](#advanced-configuration-for-esphome-and-home-assistant-experts)
- [Additional Tips and Resources](#additional-tips-and-resources)
------
## Preparation
Start by ensuring you have all the necessary tools and files. This includes your NSPanel device, a stable internet connection, and access to your Home Assistant instance.
If flashing it for the first time, please look for additional preparation and tools on the [Flashing the device for the first time](#flashing-the-device-for-the-first-time) section later in this guide.
## ESPHome Firmware
### Preparing the ESPHome Environment
To flash your NSPanel, ESPHome firmware is required. ESPHome can be integrated into your setup in various ways, including as a Home Assistant add-on or through a local installation on your computer. This guide is based on using the ESPHome dashboard, which is available in all standard implementations.
- **Installing ESPHome as a Home Assistant Add-On**: For seamless integration with Home Assistant, ESPHome can be installed as an add-on. This method provides an easy-to-navigate interface and direct integration with your Home Assistant setup. For detailed instructions on this installation method, refer to [Getting Started with ESPHome and Home Assistant](https://esphome.io/guides/getting_started_hassio).
- **Manual Installation of ESPHome**: A manual installation on your computer might be preferred if your Home Assistant's host is resource-limited and struggles with compiling ESPHome projects. Standalone installations on a normal computer typically offer faster and more efficient compiling. This method is ideal if you're working with a system that doesn't support Home Assistant add-ons or if you prefer a separate management environment for your ESPHome devices. Detailed steps for a manual installation can be found in the guide [Installing ESPHome Manually](https://esphome.io/guides/installing_esphome.html).
### Setting Up a Device on ESPHome Dashboard
Follow these steps to add a new device in the ESPHome Dashboard:
1. Click the **+ New Device** button.
2. Enter a unique name for your new ESPHome device.
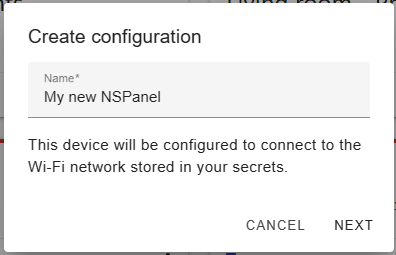
3. Select **ESP32** as the device type.

4. Click **Skip** as we're not starting the installation yet.
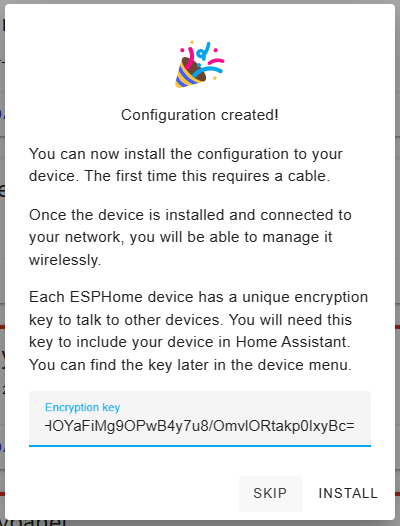
5. Locate your newly created device in the ESPHome Dashboard and click **Edit**.

6. (Optional) For enhanced security, consider copying the `api:` section to a temporary file.

7. Note the device name at the beginning of the file under `esphome`.

8. Clear all existing content and paste the following YAML configuration:
```yaml
substitutions:
# Settings - Editable values
device_name: "YOUR_NSPANEL_NAME"
wifi_ssid: !secret wifi_ssid
wifi_password: !secret wifi_password
nextion_update_url: "http://homeassistant.local:8123/local/nspanel_eu.tft"
# Add-on configuration (if needed)
# heater_relay: "1" # possible values: 1/2
# Customization area
##### My customization - Start #####
##### My customization - End #####
# Core and optional configurations
packages:
remote_package:
url: https://github.com/Blackymas/NSPanel_HA_Blueprint
ref: main
files:
- nspanel_esphome.yaml # Core package
# Optional advanced and add-on configurations
# - advanced/esphome/nspanel_esphome_advanced.yaml
# - nspanel_esphome_addon_climate_cool.yaml
# - nspanel_esphome_addon_climate_heat.yaml
# - nspanel_esphome_addon_climate_dual.yaml
refresh: 300s
esp32:
framework:
type: esp-idf
```

9. Modify the **Settings** section with your device name (as noted in step 7) and Wi-Fi details.
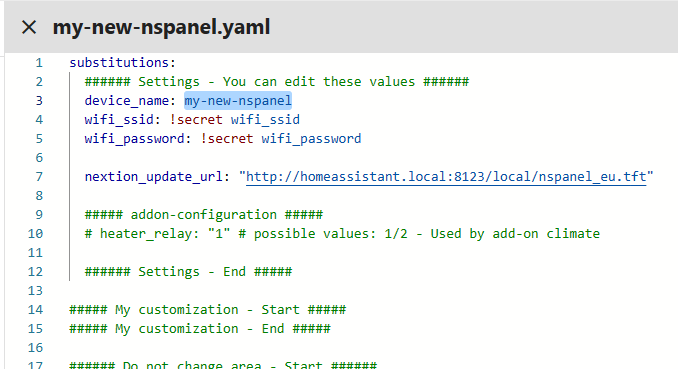
10. For Wi-Fi credentials, use `!secret` for added security or input them directly. Learn about secrets in ESPHome: [Home Assistant Secrets in ESPHome](https://www.youtube.com/watch?v=eW4vKDeHh7Y).
11. Optionally, adjust `nextion_update_url` to the URL of a TFT file hosted on an HTTP or HTTPS server, ensuring that the file is accessible to the NSPanel. This URL will be used by ESPHome to download the TFT file to your panel. For more information on hosting the TFT file and setting up the URL, see the [Upload TFT](#upload-tft) section.
12. (Optional) Enhance security with API encryption by adding the copied key from step 6 to the **My Customization** area.
13. After finalizing settings, click **Save** and close the YAML window.
Your NSPanel is now configured in your ESPHome Dashboard.
### Flashing the Device for the First Time
#### Drive Safe
> [!CAUTION]
> **Disconnect your panel's controller module from main power during all work.**
> Operating on an open device that's plugged into the wall puts you at risk of electrocution.
> [!WARNING]
> **You are solely responsible for your own safety.**
> If you're uncomfortable or if something feels wrong, stop immediately.
- Use only electronic components rated for 3.3VDC. Ensure your TTL adapter is set to 3.3VDC. Exceeding this voltage can cause permanent damage to your panel.
- Maintain a clean work area to prevent damage to your device, especially the screen.
- Keep all small parts, like screws and cables, safely stored.
#### Required Tools
For first-time flashing of your NSPanel with ESPHome, you may need:
1. [USB-to-Serial TTL adapter](https://esphome.io/guides/physical_device_connection#usb-serial-adapter)
2. [Jumper wires](https://esphome.io/guides/physical_device_connection#jumper-wires)
3. [Breakable headers (optional)](https://esphome.io/guides/physical_device_connection#pcb-headers)
4. Appropriate screwdriver to disassemble your panel's controller module (touch plate)
#### Connecting Your Device via USB-to-Serial TTL Interface
Before disassembling your panel, review the following resources:
- [YouTube - Mark Watt Tech - HOW TO - Setup the SIMPLEST Smart Home Scene Controller](https://www.youtube.com/watch?v=jpSTA_ILB8g&t=323s)
- @blakadder's [Sonoff NSPanel EU Switch in Detail](https://blakadder.com/nspanel-teardown/)
- [ESPHome - Physically Connecting to Your Device](https://esphome.io/guides/physical_device_connection)
##### Pending: (Pictures of the board & wiring will be added here)
##### Pending: (Steps to generate firmware on ESPHome Dashboard will be added here)
##### Pending: (Steps to flash the firmware using serial TTL will be added here)
### Integrating your panel to Home Assistant
##### Pending:
### Making changes Over The Air (OTA)
##### Pending: (add instructions how to flash wirelessly)
### Updating
##### Pending: (add instructions how to flash wirelessly)
##### Pending: (considerations - update all to the same version)
### Migrating from other custom firmware
The installation in a NSPanel with Sonoff's original firmware should be straighforward, however, if you have installed some other custom firmware before, you may have additional steps to execute.
#### NSPanel Lovelace UI
If you have already installed on your NSPanel the "nspanel-lovelace-ui" firmware from @joBr99 or from Tasmota, an [intermediate step](lovelace_ui.md) is necessary. Please execute that first before returning here.
#### Other
Please try the standard process and if you find any issue, please [create a new issue](/Blackymas/NSPanel_HA_Blueprint/issues) and inform which custom firmware you have installed before migrating to NSPanel HA Blueprint.
## Upload TFT
##### Pending:
### Select the right file
##### Pending:
### Uploading to Nextion
##### Pending:
### Troubleshooting TFT transfer issues
We have an useful guide for [troubleshooting TFT transfer issues](tft_upload.md). Please take a look there.
## Blueprint
This section provides guidance on importing the NSPanel HA Blueprint from our GitHub repository into your Home Assistant, creating a new automation for your panel setup, and updating the blueprint when new versions are available. These processes are straightforward with the latest versions of Home Assistant. If you have any questions or need clarification, please reach out to us.
### Importing the Blueprint
Importing the blueprint into Home Assistant is a simple process. Just click the button below and follow the steps:
[](https://my.home-assistant.io/redirect/blueprint_import/?blueprint_url=https%3A%2F%2Fgithub.com%2FBlackymas%2FNSPanel_HA_Blueprint%2Fblob%2Fmain%2Fnspanel_blueprint.yaml)
### Creating an Automation
After importing the Blueprint into Home Assistant, create a new automation using these steps:
1. Go to **Settings** → **Automations & Scenes** → **Blueprints** in Home Assistant. Alternatively, use the link below.
[](https://my.home-assistant.io/redirect/blueprints/)
2. Find the **NSPanel Configuration** Blueprint and click on it.
3. In the Blueprint settings, select your panel in the **NSPanel device** field.
4. Complete the relevant settings and click the **Save** button.
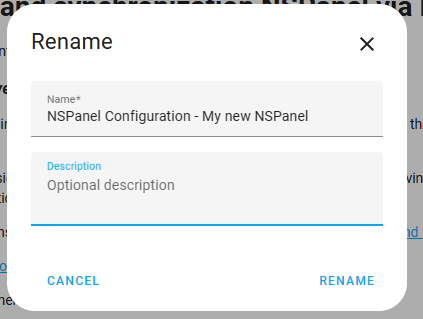
5. Name your automation for easy identification and click **Rename**.
> [!TIP]
> For a comprehensive list of panel settings, refer to the [Blueprint Guide](blueprint.md).
### Editing Automation Settings
You can modify your automation anytime to change configurations:
1. In Home Assistant, go to **Settings** → **Automations & Scenes**. Or use the link below.
[](https://my.home-assistant.io/redirect/automations/)
2. Find your automation in the list and click on it to edit.
3. After making changes, click **Save**. The new settings will be sent to your panel, usually within seconds. Some changes may require a page reload on the panel to appear.
> [!TIP]
> For a comprehensive list of panel settings, refer to the [Blueprint Guide](blueprint.md).
## How to Handle Multiple Panels
For homes with multiple panels:
1. Repeat the steps in the "Blueprint" section for each panel.
2. Ensure each panel has a unique entry in the ESPHome Dashboard and in Home Assistant under **Settings** → **Devices & Services** → **ESPHome**.
3. Create a separate automation for each panel in Home Assistant.
> [!IMPORTANT]
> Avoid assigning the same panel to multiple automations. This can cause unexpected behavior and put extra load on Home Assistant and your Wi-Fi network. Currently, Home Assistant does not have a mechanism to prevent this.
## Advanced Configuration for ESPHome and Home Assistant Experts
> [!WARNING]
> Customizations and advanced mode are not supported by this project's team. Use them with caution and only if you have the necessary expertise.
Before customizing your system, we encourage you to share any enhancements you make. Consider creating a [Pull Request](/Blackymas/NSPanel_HA_Blueprint/pulls) to the `dev` branch to share your discoveries with the community.
### ESPHome
For advanced customization with ESPHome, start with "Customizations." We have a dedicated page for this, and your contributions are welcome: [Customization](customization.md).
To use a local copy of `nspanel_esphome.yaml`, copy the file from GitHub to your local file system and include it in your ESPHome settings as follows:
```yaml
substitutions:
# Editable settings
device_name: "YOUR_NSPANEL_NAME"
wifi_ssid: !secret wifi_ssid
wifi_password: !secret wifi_password
nextion_update_url: "http://homeassistant.local:8123/local/nspanel_eu.tft"
# Add-on configuration
# heater_relay: "1" - possible values: 1/2
##### My customization - Start #####
##### My customization - End #####
packages:
local_package: !include packages/nspanel_esphome.yaml
esp32:
framework:
type: esp-idf
```
> [!NOTE]
> A sub-folder is recommended to prevent the file from being added as an additional device in the ESPHome dashboard. Alternatively, you can name the file starting with `.` to exclude it from the device list.
### Blueprint
The Blueprint file `nspanel_blueprint.yaml` can be installed manually. You can also edit your local copy of the Blueprint, but be aware that reloading the Blueprint from the repository will overwrite local changes.
### TFT File
All `.HMI` files used in this project are available in our GitHub repository. Modify these files using the [Nextion Editor](https://nextion.tech/nextion-editor/) and create your own `.tft` files for your device.
For guidance on using Nextion, refer to:
- [Nextion Instruction Set](https://nextion.tech/instruction-set)
- [Nextion Editor Guide](https://nextion.tech/editor_guide/)
## Additional Tips and Resources
> [!TIP]
> For troubleshooting TFT transfer issues, consult our [TFT Transfer Troubleshooting Guide](tft_upload.md) first.
If problems persist after troubleshooting, visit the [Issues](/Blackymas/NSPanel_HA_Blueprint/issues) page. Feel free to create a new issue for personalized assistance, providing details such as:
1. A description or picture of what is displayed on your screen.
2. Information on whether you are updating from a previous version of this project, migrating from another NSPanel customization, or customizing a panel with the original Sonoff settings.
3. ESPHome logs from the start of your panel to the point where the upload fails.
4. A description of what you have already tried.
## Important Note
Remember, these instructions serve as a guideline and may vary based on your specific setup and any systems previously installed.